
This article was originally published by a www.houzz.com . Read the Original article here. .
This article was originally published by a www.houzz.com . Read the Original article here. .

If someone in your home got sick or injured today, or if there was a natural disaster (knock on wood), would you have everything you need to care for yourself and the other members of your household? If you haven’t peeked in your medicine chest in recent memory, or simply haven’t gotten around to putting your emergency supplies together, here’s what to include in your kits, where to store them and how to maintain them properly. It’s sort of like having your teeth cleaned — you will feel good when it’s done.
Taking a first aid and CPR course from your local Red Cross is smart, particularly for those with kids or elders in the house.
If you have young children in the home, store it up high. For homes with both young and older kids, show the older children how to use a stepladder to retrieve the kit if needed, stressing that it is for emergencies only, and is not a toy.
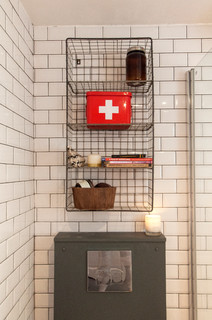
2. Medical kit. Being prepared for common illnesses, aches and pains can save a lot of hassle and midnight drugstore runs. Check expiration dates on your prescription medications, and return leftovers to the pharmacy (call ahead: most will accept them). Medications flushed down the toilet can enter our water supply; be on the safe side and take the time to dispose of them properly.
Because both over-the-counter and prescription medications can be dangerous when not taken as intended, it is best to keep them high and hidden, whether or not you have kids in the house. Safely dispose of unused, unneeded and expired medications.
Where to store: Don’t hide your kit so deep in the basement or garage that you can’t find it when you need it. In the garage near the back door, in a coat closet near the front door or in the pantry are all good choices.
Storing your supplies in a brightly colored backpack is a smart choice, as it can easily be found and toted along if you ever needed to evacuate your home.
How to be prepared for an emergency evacuation
Supplement your basic kit with personal items you would want in an emergency: medications, favorite shelf-stable foods, a change of clothes for each person in the house, pet food, plus something to read, play or do. Finally, tuck in a list of emergency numbers and a solar charger for your cellphone.
Maintaining your kits: Try to tie in maintaining your medical and emergency kits with another chore you do every six months or so, such as steam-cleaning your carpet or inspecting your gutters. Check for and dispose of expired items, and replace as necessary. Then give yourself a big pat on the back and revel in the feeling of being prepared.
More: How to pick an emergency generator
This article was originally published by a www.houzz.com . Read the Original article here. .

16. Get seasonal gear ready. What with camping and beach trips, summertime activities come with a lot of gear. Get it cleaned up and ready now, so you’re not surprised by a leaky tent or blown-out beach umbrella when it’s too late to replace them. And if you plan to waterproof anything (tents or outdoor tablecloths, for example), now is the time.
How to Store Your Outdoor Gear for Summer and All Year
This article was originally published by a www.houzz.com . Read the Original article here. .

8. Clean items on open shelves. Infrequently used items stored on open shelves can get pretty grimy over time. For items with a thin layer of dust, swipe with an electrostatic duster. If there is a thicker layer of dust, of if the items are in the kitchen (where cooking grease can be an issue), wash each piece in a tub of warm, soapy water. Rinse and allow everything to dry before replacing.
See why you should hire a professional who uses Houzz Pro
This article was originally published by a www.houzz.com . Read the Original article here. .


Wash windows. Clean the grime off glass inside and out for a lighter, brighter home indoors and increased curb appeal outdoors. Wash the exterior windows yourself by using a hose attachment, or hire a pro to get the job done.
Clean gutters and downspouts. After the last frost has passed, it’s important to have your gutters and downspouts cleaned and repaired. “Clogged gutters and downspouts can cause the wood trim at the eaves to rot, and that can invite all kinds of critters into your attic space,” Sedinger says.
Having your gutters and downspouts cleaned early in the season can also help prevent damage from spring rains. “Gutters and downspouts should be clean and running free,” Sedinger says. “If your downspouts are installed properly, water is diverted away from the house so that no water collects around your foundation.”
How to Clean Your Gutters and Downspouts
This article was originally published by a www.houzz.com . Read the Original article here. .

![]()
10. Clean and inspect screen doors and windows. Pollen and grime can also build up on window screens, so it’s a good idea to clean them once a year. For a quick cleaning, leave screens in place and vacuum with a dusting attachment. For a deeper cleaning, remove screens (mark which is which if cleaning multiple windows) and gently scrub with warm, soapy water. Rinse and let dry.
Before putting up window screens and screen doors, inspect each one for holes and rips — even small tears can let in mosquitoes. If you find any holes, repair them with a screen patch kit (available at most hardware stores).
Shop for household cleaning supplies
This article was originally published by a www.houzz.com . Read the Original article here. .

15. Inspect your home’s exterior for winter damage and make repairs as needed. Once winter storms have passed, carefully inspect the exterior of your home. If you had an ice dam on your roof during the winter, now is the time to repair any damage it caused. Ice dams form when the edges of a home’s roof are colder than the upper regions (where more insulation sits below the roof), causing ice to form around the eaves. The best way to prevent them is by upgrading insulation and ventilation in the attic.
Share: What’s on your home to-do list this March? Tell us in the Comments.
More on Houzz
Choose Your Own Spring Cleaning Plan
Find a pro for your next home project
Shop for home products
This article was originally published by a www.houzz.com . Read the Original article here. .


1. Rotate your mattress. Before you put on a fresh set of sheets, take an extra minute to rotate the mattress if you haven’t done so recently. Rotating your mattress every few months will help it wear more evenly and extend its life (and comfort).
2. Pack up a bag of old sheets and towels to donate. If you bought new sheets or towels during January white sales, make some room by letting go of an old set or two. Homeless shelters and some churches will accept donations of bedding and towels in good condition, and animal shelters are often in need of towels. Really worn linens can be cut up and used as rags or dropped in a textile recycling bin.
Find a contractor on Houzz
This article was originally published by a www.houzz.com . Read the Original article here. .


If you plan to be away during the season (and your area gets snow), hire a service in advance to clear the snow while you are away. Some cities give tickets if you allow the sidewalk in front of your home to become impassable, because this creates unsafe conditions for pedestrians.
This article was originally published by a www.houzz.com . Read the Original article here. .


Accept your strengths and weaknesses as a host. No one can do it all. The key to a low-stress event is to play up your strengths and outsource your not-so-favorite parts of entertaining. For instance, finish a homemade meal with a lovely dessert from a local bakery or throw a potluck buffet or cocktail party instead of having a formal sit-down meal.
Keep things real. Your guests are there to enjoy your company, not judge your home or your cooking. If you’re not “done” getting things ready before your guests arrive, ask for help. Most guests are more than happy to pitch in lighting candles, setting the table, stirring a pot or pouring wine. And before reading the checklist that follows, remember that you can always rent party gear rather than buy rarely used items.
This article was originally published by a www.houzz.com . Read the Original article here. .

Check safety devices. Smoke alarms and carbon monoxide detectors should be tested at least once a month and replaced every 10 years, according to the U.S. Fire Administration. Test smoke detectors and carbon monoxide detectors by pressing the test button; replace batteries as needed. Also, take a moment to check the expiration date on any fire extinguishers in the house and replace them if needed.
Find a general contractor on Houzz